<thead id="kdfuf"><font id="kdfuf"></font></thead>
<samp id="kdfuf"></samp>
    <nav id="kdfuf"><strong id="kdfuf"></strong></nav>
      中文字幕无码一区二区三区在线,久久精品人人做人人爽,国产一级内射无挡观看,十八禁在线黄色网站,日韩欧美国产另类久久久精品 ,少妇人妻偷人精品一区二区,久久午夜视频,亚洲春色AⅤ无码专区

      vue傳值方式總結 (十二種方法)

      2021-4-25    前端達人

      一.父傳子傳遞

      (1)在父組件的子組件標簽上綁定一個屬性,掛載要傳輸的變量
      (2)在子組件中通過props來接受數據,props可以是數組也可以是對象,接受的數據可以直接使用 props: [“屬性 名”] props:{屬性名:數據類型}
      代碼示例:

      //父組件
      <template>
        <div>
          <i>父組件</i>
          <!--頁面使用-->
          <son :data='name'></son> 
        </div>
      </template>
      
      <script>
      import son from "./son.vue";//導入父組件
      export default {
        components: { son },//注冊組件
        name: "父組件",
        data() {
          return {
            name: "Frazier", //父組件定義變量
          };
        },
      };
      </script> 
      
      • 1
      • 2
      • 3
      • 4
      • 5
      • 6
      • 7
      • 8
      • 9
      • 10
      • 11
      • 12
      • 13
      • 14
      • 15
      • 16
      • 17
      • 18
      • 19
      • 20
      • 21
      //子組件
      <template>
        <div>{{data}}</div>
      </template>
      
      <script>
      export default {
      components: { },
        name: '子組件',
        props:["data"],
      };
      </script> 
      
      • 1
      • 2
      • 3
      • 4
      • 5
      • 6
      • 7
      • 8
      • 9
      • 10
      • 11
      • 12

      二.子傳父傳遞

      (1)在父組件的子組件標簽上自定義一個事件,然后調用需要的方法
      (2)在子組件的方法中通過 this.$emit(“事件”)來觸發在父組件中定義的事件,數據是以參數的形式進行傳遞的
      代碼示例:

      //父組件
      <template>
        <div>
          <i>父組件</i>
          <!--頁面使用-->
          <son @lcclick="lcclick"></son>//自定義一個事件
        </div>
      </template>
      
      <script>
      import son from "./son.vue"; //導入父組件
      export default {
        components: { son }, //注冊組件
        name: "父組件",
        data() {
          return {};
        },
        methods: {
          lcclick(){
            alert('子傳父')
          }
        },
      };
      </script> 
      
      • 1
      • 2
      • 3
      • 4
      • 5
      • 6
      • 7
      • 8
      • 9
      • 10
      • 11
      • 12
      • 13
      • 14
      • 15
      • 16
      • 17
      • 18
      • 19
      • 20
      • 21
      • 22
      • 23
      • 24
      • 25
      //子組件
      <template>
        <div>
          <button @click="lcalter">點我</button>
        </div>
      </template>
      
      <script>
      export default {
      components: { },
        name: '子組件',
        methods: {
          lcalter(){
            this.$emit('lcclick')//通過emit來觸發事件
          }
        },
      };
      </script> 
      
      • 1
      • 2
      • 3
      • 4
      • 5
      • 6
      • 7
      • 8
      • 9
      • 10
      • 11
      • 12
      • 13
      • 14
      • 15
      • 16
      • 17
      • 18

      三.兄弟組件通信(bus總線)

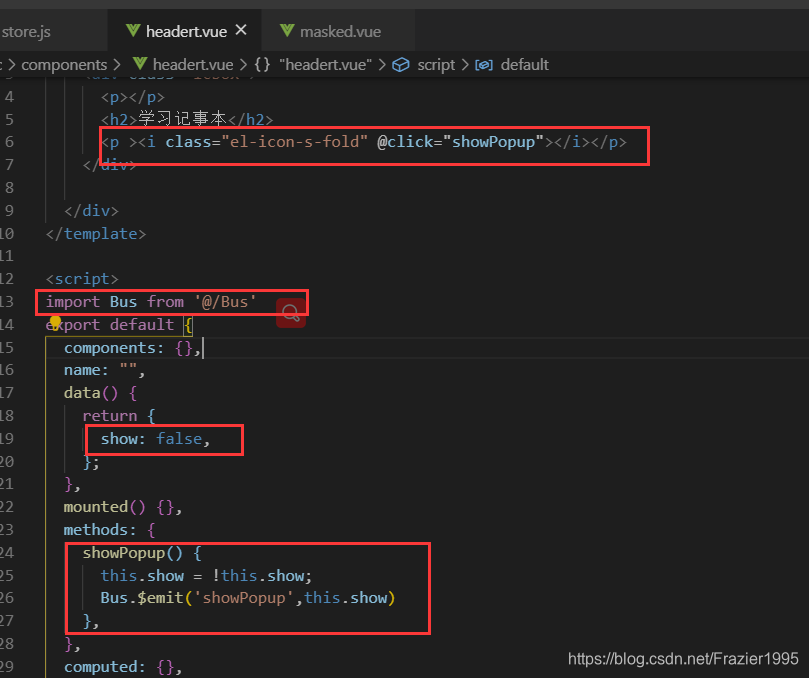
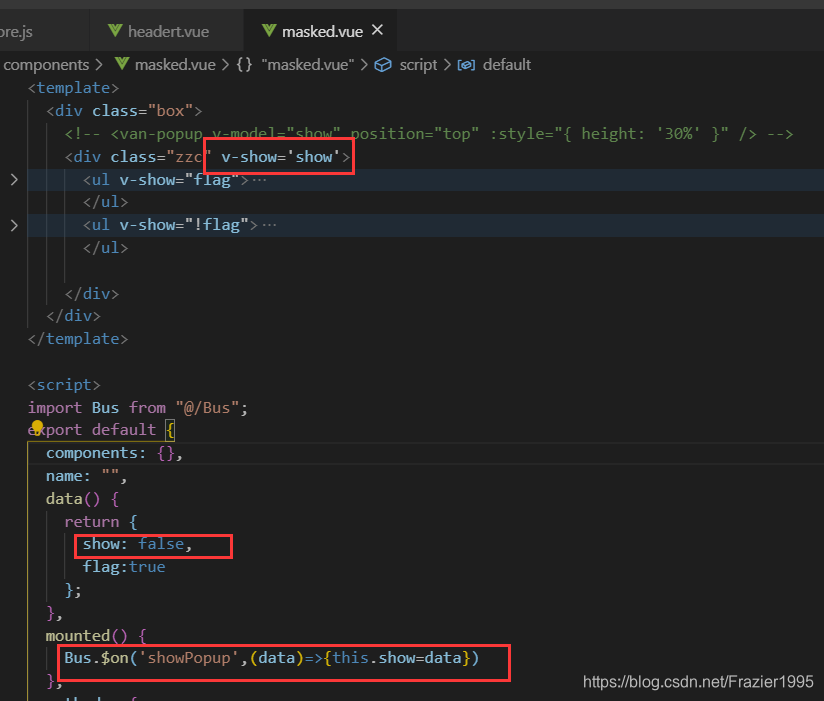
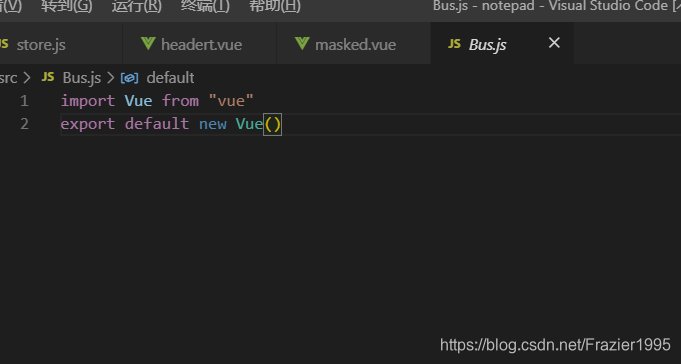
      (1)在src中新建一個Bus.js的文件,然后導出一個空的vue實例
      (2)在傳輸數據的一方引入Bus.js 然后通過Bus.e m i t ( “ 事 件 名 ” , " 參 數 " ) 來 來 派 發 事 件 , 數 據 是 以 emit(“事件名”,"參數")來來派發事件,數據是以emit(,"")emit()的參 數形式來傳遞
      (3)在接受的數據的一方 引入 Bus.js 然后通過 Bus.$on(“事件名”,(data)=>{data是接受的數據})
      圖片示例:
      在這里插入圖片描述
      在這里插入圖片描述
      在這里插入圖片描述

      四.ref/refs(父子組件通信)

      (1)ref 如果在普通的 DOM 元素上使用,引用指向的就是 DOM 元素;如果用在子組件上,引用就指向組件實例,
      (2)可以通過實例直接調用組件的方法或訪問數據。也算是子組件向父組件傳值的一種
      代碼示例:

      //父組件
      <template>
        <div>
          <button @click="sayHello">sayHello</button>
          <child ref="childForRef"></child>
        </div>
      </template>
      <script>
      import child from './child.vue'
        export default {
          components: { child },
          data () {
            return {
              childForRef: null,
            }
          },
          mounted() {
            this.childForRef = this.$refs.childForRef;
            console.log(this.childForRef.name);
          },
          methods: {
            sayHello() {
              this.childForRef.sayHello()
            }
          }
        }
      </script> 
      
      • 1
      • 2
      • 3
      • 4
      • 5
      • 6
      • 7
      • 8
      • 9
      • 10
      • 11
      • 12
      • 13
      • 14
      • 15
      • 16
      • 17
      • 18
      • 19
      • 20
      • 21
      • 22
      • 23
      • 24
      • 25
      • 26
      • 27
      //子組件
      <template>
        <div>child 的內容</div>
      </template>
      <script>
      export default {
        data () {
          return {
            name: '我是 child',
          }
        },
        methods: {
          sayHello () {
            console.log('hello');
            alert('hello');
          }
        }
      }
      </script> 
      
      • 1
      • 2
      • 3
      • 4
      • 5
      • 6
      • 7
      • 8
      • 9
      • 10
      • 11
      • 12
      • 13
      • 14
      • 15
      • 16
      • 17
      • 18
      • 19

      五.Vuex通信

      組件通過 dispatch 到 actions,actions 是異步操作,再 actions中通過 commit 到 mutations,mutations 再通過邏輯操作改變 state,從而同步到組件,更新其數據狀態
      代碼示例:

      //父組件
      template>
        <div id="app">
          <ChildA/>
          <ChildB/>
        </div>
      </template>
      <script>
        import ChildA from './ChildA' // 導入A組件
        import ChildB from './ChildB' // 導入B組件
        export default {
          components: {ChildA, ChildB} // 注冊組件
        }
      </script> 
      
      • 1
      • 2
      • 3
      • 4
      • 5
      • 6
      • 7
      • 8
      • 9
      • 10
      • 11
      • 12
      • 13
      • 14
      //子組件A
      <template>
       <div id="childA">
         <h1>我是A組件</h1>
         <button @click="transform">點我讓B組件接收到數據</button>
         <p>因為點了B,所以信息發生了變化:{{BMessage}}</p>
       </div>
      </template>
      <script>
       export default {
         data() {
           return {
             AMessage: 'Hello,B組件,我是A組件'
           }
         },
         computed: {
           BMessage() {
             // 這里存儲從store里獲取的B組件的數據
             return this.$store.state.BMsg
           }
         },
         methods: {
           transform() {
             // 觸發receiveAMsg,將A組件的數據存放到store里去
             this.$store.commit('receiveAMsg', {
               AMsg: this.AMessage
             })
           }
         }
       }
      </script> 
      
      • 1
      • 2
      • 3
      • 4
      • 5
      • 6
      • 7
      • 8
      • 9
      • 10
      • 11
      • 12
      • 13
      • 14
      • 15
      • 16
      • 17
      • 18
      • 19
      • 20
      • 21
      • 22
      • 23
      • 24
      • 25
      • 26
      • 27
      • 28
      • 29
      • 30
      • 31
      //子組件B
      <template>
       <div id="childB">
         <h1>我是B組件</h1>
         <button @click="transform">點我讓A組件接收到數據</button>
         <p>點了A,我的信息發生了變化:{{AMessage}}</p>
       </div>
      </template>
      
      <script>
       export default {
         data() {
           return {
             BMessage: 'Hello,A組件,我是B組件'
           }
         },
         computed: {
           AMessage() {
             // 這里存儲從store里獲取的A組件的數據
             return this.$store.state.AMsg
           }
         },
         methods: {
           transform() {
             // 觸發receiveBMsg,將B組件的數據存放到store里去
             this.$store.commit('receiveBMsg', {
               BMsg: this.BMessage
             })
           }
         }
       }
      </script> 
      
      • 1
      • 2
      • 3
      • 4
      • 5
      • 6
      • 7
      • 8
      • 9
      • 10
      • 11
      • 12
      • 13
      • 14
      • 15
      • 16
      • 17
      • 18
      • 19
      • 20
      • 21
      • 22
      • 23
      • 24
      • 25
      • 26
      • 27
      • 28
      • 29
      • 30
      • 31
      • 32
      • 33
      //vuex
      import Vue from 'vue'
       import Vuex from 'vuex'
       Vue.use(Vuex)
       const state = {
         AMsg: '',
         BMsg: ''
       }
      
       const mutations = {
         receiveAMsg(state, payload) {
           // 將A組件的數據存放于state
           state.AMsg = payload.AMsg
         },
         receiveBMsg(state, payload) {
           // 將B組件的數據存放于state
           state.BMsg = payload.BMsg
         }
       }
      
       export default new Vuex.Store({
         state,
         mutations
       }) 
      
      • 1
      • 2
      • 3
      • 4
      • 5
      • 6
      • 7
      • 8
      • 9
      • 10
      • 11
      • 12
      • 13
      • 14
      • 15
      • 16
      • 17
      • 18
      • 19
      • 20
      • 21
      • 22
      • 23
      • 24
      • 25

      六.$parent

      通過parent可以獲父組件實例 ,然 后通過這個實例就可以訪問父組件的屬 性和方法 ,它還有一個兄弟parent可以獲父組件實例,然后通過這個實例就可以訪問父組件的屬性和方法,它還有一個兄弟parent可以獲父組件實例,然后通過這個實例就可以訪問父組件的屬性和方法,它還有一個兄弟root,可以獲取根組件實例。
      代碼示例:

      // 獲父組件的數據
      this.$parent.foo
      
      // 寫入父組件的數據
      this.$parent.foo = 2
      
      // 訪問父組件的計算屬性
      this.$parent.bar
      
      // 調用父組件的方法
      this.$parent.baz()
      
      //在子組件傳給父組件例子中,可以使用this.$parent.getNum(100)傳值給父組件。 
      
      • 1
      • 2
      • 3
      • 4
      • 5
      • 6
      • 7
      • 8
      • 9
      • 10
      • 11
      • 12
      • 13

      七.sessionStorage傳值

      sessionStorage 是瀏覽器的全局對象,存在它里面的數據會在頁面關閉時清除 。運用這個特性,我們可以在所有頁面共享一份數據。
      代碼示例:

      // 保存數據到 sessionStorage
      sessionStorage.setItem('key', 'value');
      
      // 從 sessionStorage 獲取數據
      let data = sessionStorage.getItem('key');
      
      // 從 sessionStorage 刪除保存的數據
      sessionStorage.removeItem('key');
      
      // 從 sessionStorage 刪除所有保存的數據
      sessionStorage.clear(); 
      
      • 1
      • 2
      • 3
      • 4
      • 5
      • 6
      • 7
      • 8
      • 9
      • 10
      • 11

      注意:里面存的是鍵值對,只能是字符串類型,如果要存對象的話,需要使用 let objStr = JSON.stringify(obj) 轉成字符串然后再存儲(使用的時候 let obj = JSON.parse(objStr) 解析為對象)。
      推薦一個庫 good-storage ,它封裝了sessionStorage ,可以直接用它的API存對象

      //localStorage
       storage.set(key,val) 
       storage.get(key, def)
      //sessionStorage
       storage.session.set(key, val)
       storage.session.get(key, val) 
      
      • 1
      • 2
      • 3
      • 4
      • 5
      • 6

      八.路由傳值

      使用問號傳值
      A頁面跳轉B頁面時使用 this.r o u t e r . p u s h ( ’ / B ? n a m e = d a n s e e k ’ ) B 頁 面 可 以 使 用 t h i s . router.push(’/B?name=danseek’) B頁面可以使用 this.router.push(/B?name=danseek)B使this.route.query.name 來獲取A頁面傳過來的值
      上面要注意router和route的區別
      使用冒號傳值
      配置如下路由:

      {
          path: '/b/:name',
          name: 'b',
          component: () => import( '../views/B.vue')
       }, 
      
      • 1
      • 2
      • 3
      • 4
      • 5

      在B頁面可以通過 this.$route.params.name 來獲取路由傳入的name的值

      使用父子組件傳值
      由于router-view本身也是一個組件,所以我們也可以使用父子組件傳值方式傳值,然后在對應的子頁面里加上props,因為type更新后沒有刷新路由,所以不能直接在子頁面的mounted鉤子里直接獲取最新type的值,而要使用watch

      <router-view :type="type"></router-view>
      
      // 子頁面
      props: ['type']
      watch: {
             type(){
                 // console.log("在這個方法可以時刻獲取最新的數據:type=",this.type)
             },
      }, 
      
      • 1
      • 2
      • 3
      • 4
      • 5
      • 6
      • 7
      • 8
      • 9

      九.祖傳孫 $attrs

      正常情況下需要借助父親的props作為中間過渡,但是這樣在父親組件就會多了一些跟父組件業務無關的屬性,耦合度高,借助$attrs可以簡化些,而且祖跟孫都無需做修改
      祖組件:

      <template>
          <section>
              <parent name="grandParent" sex="男" age="88" hobby="code" @sayKnow="sayKnow"></parent>
          </section>
      </template>
      
      <script>
          import Parent from './Parent'
          export default {
              name: "GrandParent",
              components: {
                Parent
              },
              data() {
                  return {}
              },
              methods: {
                sayKnow(val){
                  console.log(val)
                }
              },
              mounted() {
              }
          }
      </script> 
      
      • 1
      • 2
      • 3
      • 4
      • 5
      • 6
      • 7
      • 8
      • 9
      • 10
      • 11
      • 12
      • 13
      • 14
      • 15
      • 16
      • 17
      • 18
      • 19
      • 20
      • 21
      • 22
      • 23
      • 24
      • 25

      父組件

      template>
        <section>
          <p>父組件收到</p>
          <p>祖父的名字:{{name}}</p>
          <children v-bind="$attrs" v-on="$listeners"></children>
        </section>
      </template>
      
      <script>
        import Children from './Children'
      
        export default {
          name: "Parent",
          components: {
            Children
          },
          // 父組件接收了name,所以name值是不會傳到子組件的
          props:['name'],
          data() {
            return {}
          },
          methods: {},
          mounted() {
          }
        }
      </script> 
      
      • 1
      • 2
      • 3
      • 4
      • 5
      • 6
      • 7
      • 8
      • 9
      • 10
      • 11
      • 12
      • 13
      • 14
      • 15
      • 16
      • 17
      • 18
      • 19
      • 20
      • 21
      • 22
      • 23
      • 24
      • 25
      • 26

      子組件

      <template>
        <section>
          <p>子組件收到</p>
          <p>祖父的名字:{{name}}</p>
          <p>祖父的性別:{{sex}}</p>
          <p>祖父的年齡:{{age}}</p>
          <p>祖父的愛好:{{hobby}}</p>
      
          <button @click="sayKnow">我知道啦</button>
        </section>
      </template>
      
      <script>
        export default {
          name: "Children",
          components: {},
          // 由于父組件已經接收了name屬性,所以name不會傳到子組件了
          props:['sex','age','hobby','name'],
          data() {
            return {}
          },
          methods: {
            sayKnow(){
              this.$emit('sayKnow','我知道啦')
            }
          },
          mounted() {
          }
        }
      </script> 
      
      • 1
      • 2
      • 3
      • 4
      • 5
      • 6
      • 7
      • 8
      • 9
      • 10
      • 11
      • 12
      • 13
      • 14
      • 15
      • 16
      • 17
      • 18
      • 19
      • 20
      • 21
      • 22
      • 23
      • 24
      • 25
      • 26
      • 27
      • 28
      • 29
      • 30
      • 31

      十.孫傳祖使用$listeners

      文字內容同第九個

      祖組件

      <template>
        <div id="app">
          <children-one @eventOne="eventOne"></children-one>
          {{ msg }}
        </div>
      </template>
      <script>
      import ChildrenOne from '../src/components/children.vue'
      export default {
        name: 'App',
        components: {
          ChildrenOne,
        },
        data() {
          return {
            msg: ''
          }
        },
        methods: {
          eventOne(value) {
            this.msg = value
          }
        }
      }
      </script> 
      
      • 1
      • 2
      • 3
      • 4
      • 5
      • 6
      • 7
      • 8
      • 9
      • 10
      • 11
      • 12
      • 13
      • 14
      • 15
      • 16
      • 17
      • 18
      • 19
      • 20
      • 21
      • 22
      • 23
      • 24
      • 25

      父組件

      <template>
        <div>
          <children-two v-on="$listeners"></children-two>
        </div>
      </template>
      
      <script>
      import ChildrenTwo from './childrenTwo.vue'
      
      export default {
        name: 'childrenOne',
        components: {
          ChildrenTwo
        }
      }
      </script> 
      
      • 1
      • 2
      • 3
      • 4
      • 5
      • 6
      • 7
      • 8
      • 9
      • 10
      • 11
      • 12
      • 13
      • 14
      • 15
      • 16

      子組件

      <template>
        <div>
          <button @click="setMsg">點擊傳給祖父</button>
        </div>
      </template>
      
      <script>
      export default {
        name: 'children',
        methods: {
          setMsg() {
            this.$emit('eventOne', '123')
          }
        }
      }
      </script> 
      
      • 1
      • 2
      • 3
      • 4
      • 5
      • 6
      • 7
      • 8
      • 9
      • 10
      • 11
      • 12
      • 13
      • 14
      • 15
      • 16

      十一.promise傳參

      promise 中 resolve 如何傳遞多個參數

      //類似與這樣使用,但實際上后面兩個參數無法獲取
      promise = new Promise((resolve,reject)=>{
          let a = 1
          let b = 2
          let c = 3
          resolve(a,b,c) 
      })
      promise.then((a,b,c)=>{
          console.log(a,b,c)
      }) 
      
      • 1
      • 2
      • 3
      • 4
      • 5
      • 6
      • 7
      • 8
      • 9
      • 10

      resolve() 只能接受并處理一個參數,多余的參數會被忽略掉。
      如果想多個用數組,或者對象方式。。
      數組

      promise = new Promise((resolve,reject)=>{
          resolve([1,2,3]) 
      })
      promise.then((arr)=>{
          console.log(arr[0],arr[1],arr[2])
      }) 
      
      • 1
      • 2
      • 3
      • 4
      • 5
      • 6
      • 7

      對象

      promise = new Promise((resolve,reject)=>{
          resolve({a:1,b:2,c:3}) 
      })
      promise.then(obj=>{
          console.log(obj.a,obj.b,obj.c)
      }) 
      
      • 1
      • 2
      • 3
      • 4
      • 5
      • 6
      • 7

      十二.全局變量

      定義一個全局變量,在有值的組件直接賦值,在需要的組件內直接使用就可以了。


      轉自:csdn 作者:Frazier_梁超


      藍藍設計www.tuitetiyu.cn )是一家專注而深入的界面設計公司,為期望卓越的國內外企業提供卓越的UI界面設計、BS界面設計 、 cs界面設計 、 ipad界面設計 、 包裝設計 、 圖標定制 、 用戶體驗 、交互設計、 網站建設 平面設計服務

      日歷

      鏈接

      個人資料

      藍藍設計的小編 http://www.tuitetiyu.cn

      存檔

      主站蜘蛛池模板: 欧美自拍另类欧美综合图片| 伊人久在线观看视频| 亚洲无码免费在线观看| jizz中国jizz在线播放| 香蕉久久国产精品免| 亚洲国产精品无码久久一线| 最新熟女中文字幕97| 中文人妻av高清一区二区| 久久人人97超碰香蕉987| 久久九九高潮免费毛片| 国产欧美亚洲精品第1页青草| 欧洲美熟女乱av在免费| 久久久一本精品99久久精品88| 国产老熟女六十路| 久久久久亚洲av成人网人人网站| 2022精品无码视频在线观看| 真人一级毛片全部播放暴菊| 亚洲精品国语在线不卡| 免费女人高潮流视频在线观看| 国产欧美日韩va另类影音先锋 | 国产高潮视频在线观看| 亚洲精品无码AV人在线观看国产| 免费分享最新最快的成人影视资源网站 | 92精品国产自产在线观看4| 国产边打电话边被躁视频| 噜噜综合亚洲av中文无码| 亚洲国产另类精品18| 中国GAY片男同志免费网站| 亚洲日韩精品国产3区| 久久天天躁狠狠躁夜夜免费观看| 3dh无码中文动漫| 英语课代表哭着说太深了视频| 欧美国产激情18| 在线中文字幕亚洲日韩日本| 亚洲一区二区中文字幕| 成年美女黄网站色大免费视频| 国产亚洲精品久久久久久| 色哟哟网站入口在线观看视频| 久久国产成人亚洲精品影院老金| 九九re线精品视频在线观看视频| 责任分散久久精品—区二区三区美女|